Workflow
- 5 Minutes to read
Workflow
- 5 Minutes to read
Article summary
Did you find this summary helpful?
Thank you for your feedback!
Workflows:
Maxyfi has facilitated you with pre-defined workflows that are suitable for all customer standards and dunning processes. These workflows will be pre-loaded based on the payment terms like 30-day workflow, 60-day workflow, and so on.
You can find all the workflows on the "Workflow Tab" of our application. Depending on your needs, you can use either the predefined workflows that are already loaded or you can create on your own.
You can see the workflows you've modified recently, by selecting the "Last Modified Tab". In the "Most Used Tab", you can find the workflows that you've used frequently to follow up on your customers.
We've also provided the filter to view only Standard Workflows, Premium Workflows, or All workflows so that you can find them easily.
Also, you can find any workflow by just searching for them with their Name or Description.
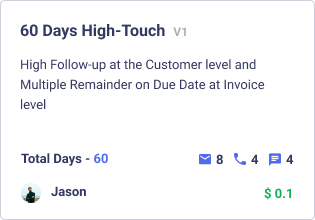
In the Workflow tab, you can have an overall view of the dunning templates. By clicking the "Eye Icon" on each workflow template you can view them. Also, you can choose the number of rows you can view on a page. This will decide how many pages you have on the communication tab.
Add Workflow
If you would like to create a new Workflow, click on "Add Workflow", which you can find on the landing page of the Workflow Tab.

When you click on "Add Workflow" the below pop will appear.
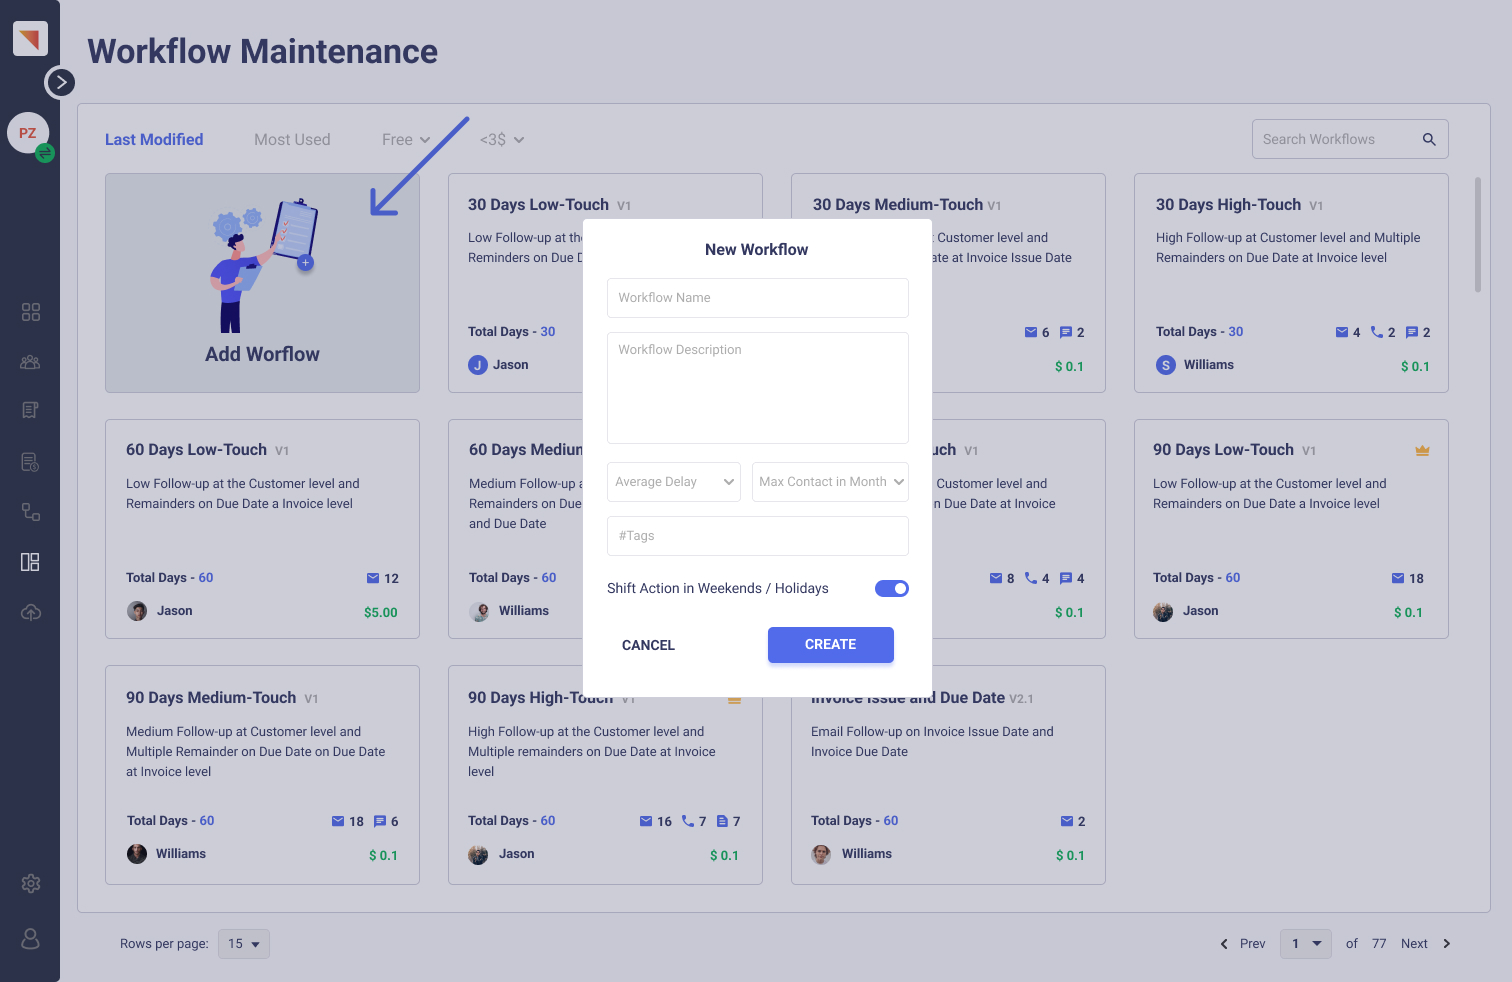
Workflow Name - Provide a meaningful name for your Workflow. This name will be displayed on the other parts of the application like the Actions tab.
Workflow Description - You might have different workflows for the 30-day dunning process. So to avoid confusion, you can provide a description of your workflow that will facilitate a quicker understanding of that particular workflow.
Max Contact In A Month - Here you have to enter the maximum number of times you're going to follow up with your customer in a month. For example, if you enter 15, you can make only 15 follow-ups in a month. If you try to exceed this limit, our application will provide you with an alert.
Avg Delay - You can also specify the average delay of the action. This will decide the interval between each action.
Add #Tags - You can add multiple tags to your workflows to find them quickly and for more specifications.
Shift Action On Weekends/Holidays - If you enable this option, the follow-ups will not be delivered at weekends or holidays.
Once you fill in all these details, click "Create". After completing this process, you can set up the workflow by following the below instructions.
Customer Workflow Setup
Click on the " + " to add multiple actions to your workflow. Once the action is added, select the "Day" and "Time" on which the action should take place. This is set in default, based on the Avg Delay you specified earlier. However, this can be altered.
Let's assume, your avg delay is 4. If the first action is scheduled on Day 1, the second action will be predominantly taken on Day 5. You can alter this according to your needs.
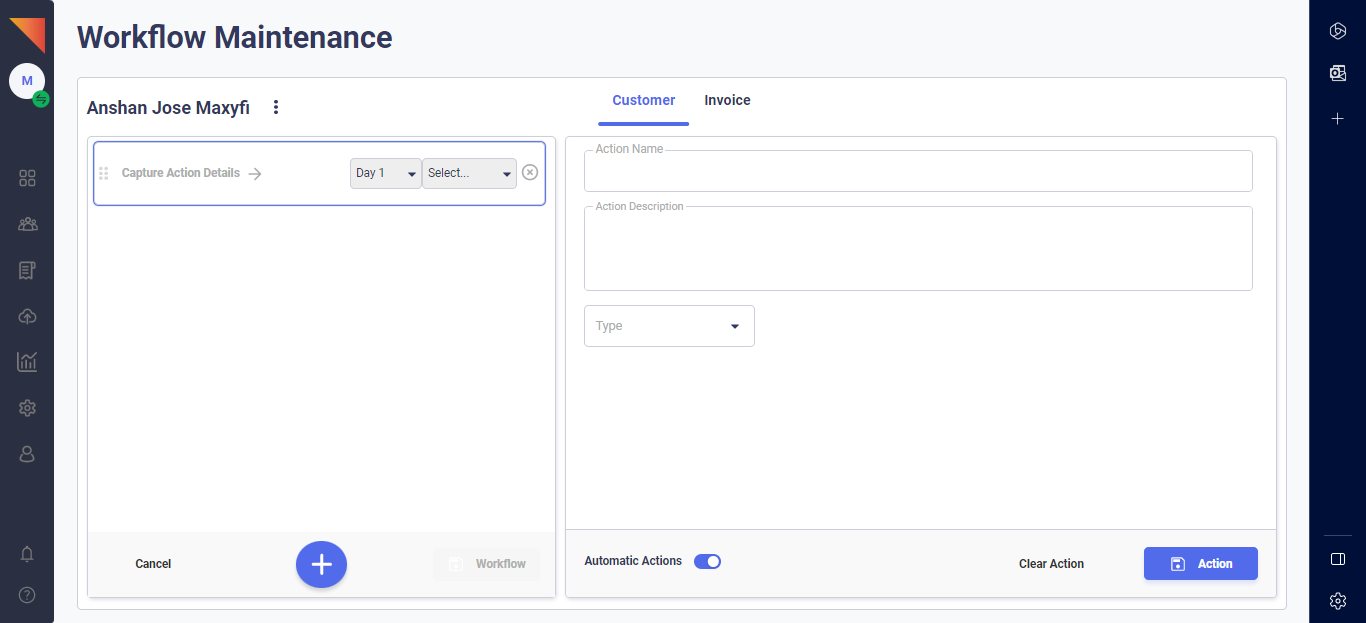
1. Email Action:
- Once you create a new action, fill in the details like Name and Description.
Select the type of Action such as Email, SMS, WhatsApp, or Call.
If you select Email follow-up, choose any email template that you've already added to your Communication Templates.
Choose a Recipient. Here, you can add Primary contact and Escalation contact.
Fill in a Subject Preview and Content Preview.
Once you complete, click on "Action Icon" to save your action.
The Automatic Action toggle switch can also be activated in order to automate the action and this needs to be done separately for every single action.
Similar steps can be taken for the Invoice Level, but by default, the Automatic Action toggle switch will be on.
If you want to clear the actions made, click on "Clear Action".
2. SMS Action:
- Once you create a new action, fill in the details like Name and Description.
Select the type of Action such as Email, SMS, WhatsApp, or Call.
If you select SMS follow-up, choose any SMS template that you've already added to your Communication Templates.
Choose a Recipient. Here, you can add Primary contact and Escalation contact.
Fill in a Content Preview.
Once you complete, click on "Action Icon" to save your action.
The Automatic Action toggle switch can also be activated in order to automate the action and this needs to be done separately for every single action.
Similar steps can be taken for the Invoice Level, but by default, the Automatic Action toggle switch will be on.
If you want to clear the actions made, click on "Clear Action".
3. WhatsApp Action:
- Once you create a new action, fill in the details like Name and Description.
Select the type of Action such as Email, SMS, WhatsApp, or Call.
If you select WhatsApp follow-up, choose any WhatsApp template that you've already added to your Communication Templates.
Choose a Recipient. Here, you can add Primary contact and Escalation contact.
Fill in a Content Preview.
Once you complete, click on "Action Icon" to save your action.
The Automatic Action toggle switch can also be activated in order to automate the action and this needs to be done separately for every single action.
Similar steps can be taken for the Invoice Level, but by default, the Automatic Action toggle switch will be on.
If you want to clear the actions made, click on "Clear Action".
By clicking on the three dots, you can alter the Name, Description, Max Contact in a month, Avg Delay, Add #Tags, and enable or disable the Shift Action on Weekends and Holidays. After making the required changes, just click "Save".
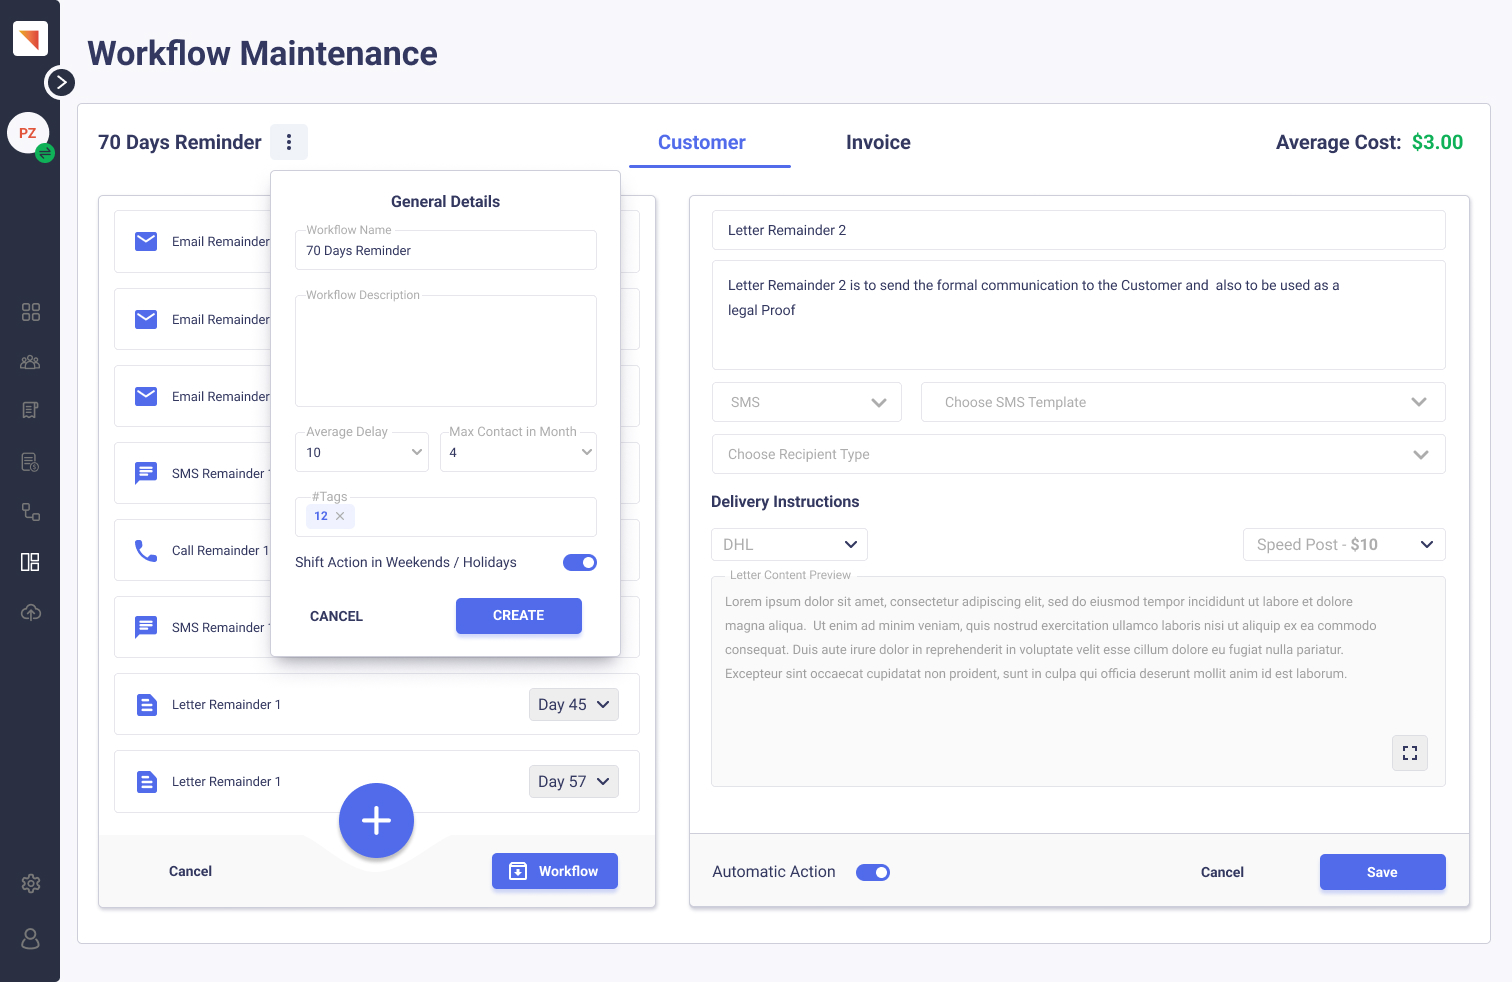
You can also swap the actions and rearrange them at your convenience. While swapping actions, you've to reset the "Day" the action will be made.
Once you've completed all the setup, click on "Workflow Icon", to save.
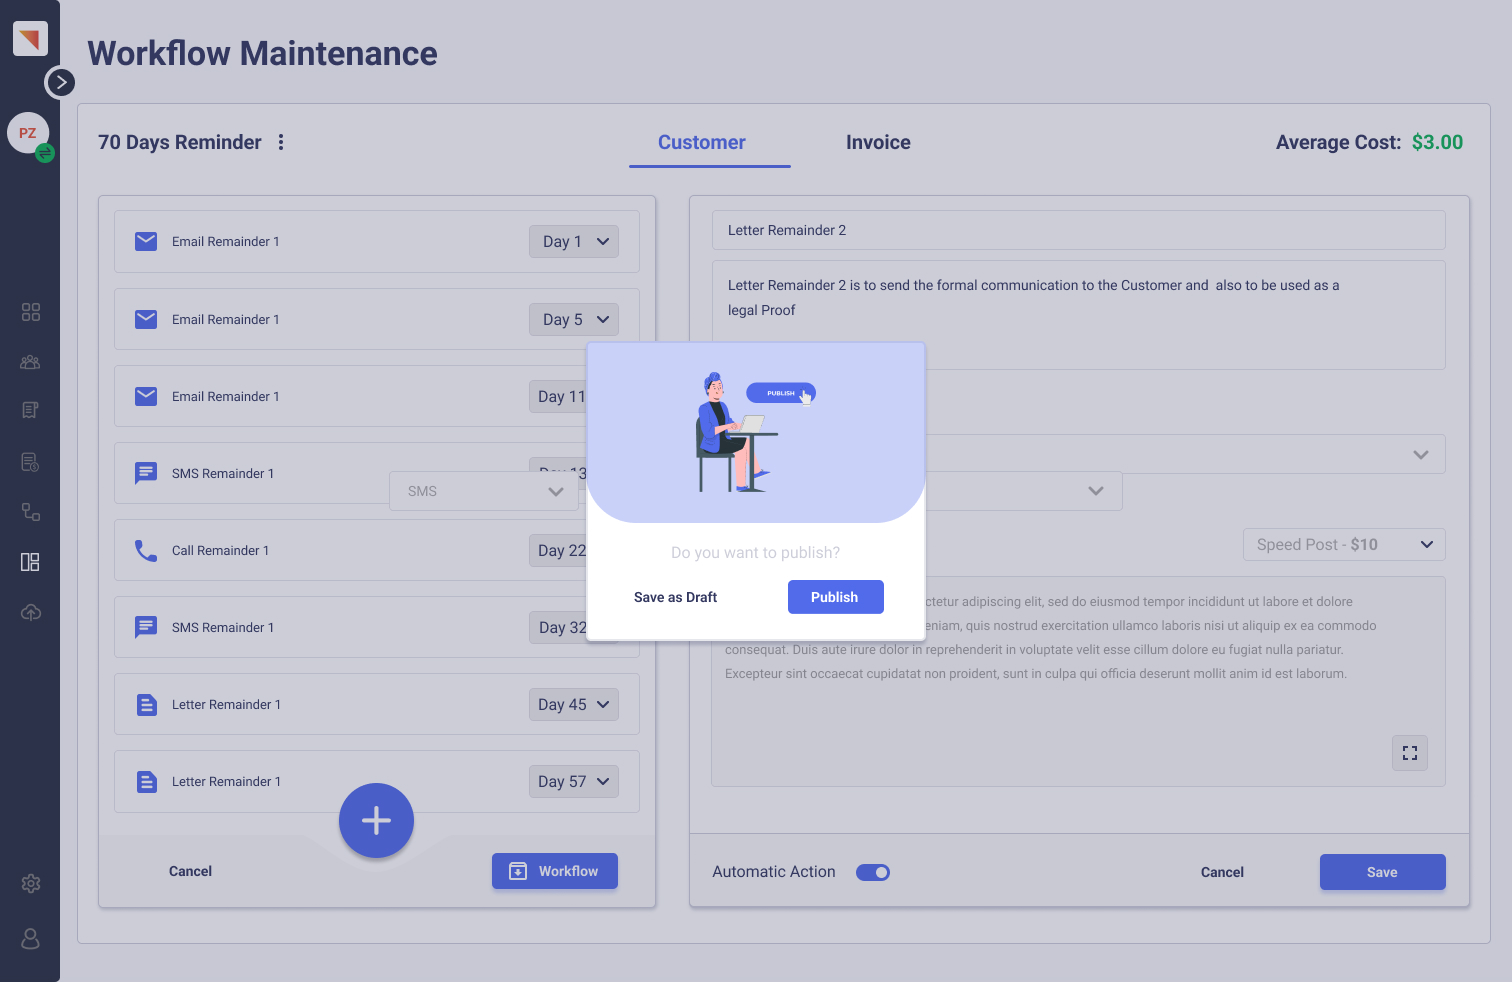
If you select "Publish", your workflow will be saved and you can find that workflow in the suggestions on the Actions Tab.
If you select "Save as draft", your workflow will be saved in the draft, and that workflow template will not be found in the suggestions on the Actions Tab.
Maxyfi provides you with the details of how many days the actions of your workflow will take and the cost you'll incur to take those actions. For example, If you're sending 3 to 4 SMS in a particular workflow, we'll estimate the total cost you'll incur to send those SMS.
Was this article helpful?